I’m over HERE! Useful posts from this WP blog have been ported to the new one. See you around!

My Friend Flickr

I’m over HERE! Useful posts from this WP blog have been ported to the new one. See you around!
Posted in 93032

For awhile now, friends & family have been asking me to teach them to bake my bread or write up the method I use, and I have put it off repeatedly. Not because it’s a closely guarded secret, but rather because the “method” is actually a bit of a moving target, a never-ending work-in-progress. As an experimentalist/obsessive-compulsive, I simply cannot leave well enough alone, and am always tweaking my recipes in one direction or another, not necessarily to improve them so much as to see what-happens-if.
Therefore, in order to teach one of my recipes to others, I have to somehow wrestle this greased pig to the ground to take its current snapshop. On top of this, most people haven’t the time nor inclination to be as obsessive as I am about measurements, materials, and methods, and want just a simple 1-2-3 recipe that they can throw together at the end of the day without giving much thought to the whys and what-fors.
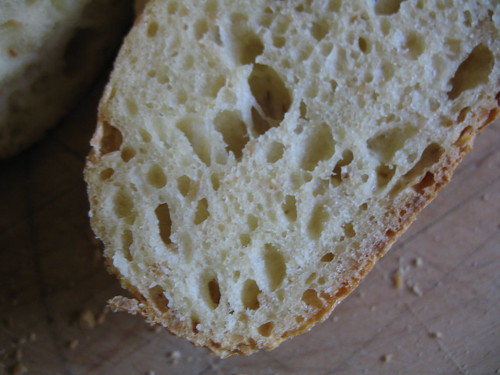
The following recipe is where it stands as of today. It makes a single, 800g, round, “miche” or country-style loaf, with 100% white flour. There are endless variations on this theme possible, some of which I will describe in due time (including a 100% whole wheat loaf, especially for J&D and their fancy-pants Hawo grinder), but for now, this is the best place for beginners to start. It is a relatively easy dough to work with, and the most forgiving. Above all, its flavor is bad-ass, particularly after 3 or 4 days’ worth of fermentation. Once you master this loaf, you’ll be ready for anything.
So here goes:
Some-Fold Bread*
(*I call this ‘some-fold’ bread, to distinguish it from the ‘No-Knead Bread’ recipe popularized by Mark Bittman and Steve Lahey in the NYT a few years ago, which was the jumping off point for this recipe. My method remains ‘no-knead’, but does call for more work than the former, with corresponding improvement in flavor and longevity.)
Makes one 800g loaf
Ingredients:
(Note: if you have a digital scale, please use it to weigh out the ingredients as listed below; you will get much more consistent results. If you don’t have one (yet), at least make sure you use the correct type of measuring cups: metal squat ones for dry ingredients, pyrex ones for liquids.)
2-3/4 cups All-Purpose Flour (410g)
1-1/4 cup water (300g)
1/3 cup Sourdough Starter or Yeast Sponge (80g)
2 tsp Sea salt or Kosher salt (10g)
Rice flour for dusting
Tools (see notes section below for explanations):
Enameled Cast-Iron Pot (6-8 quarts)
Linen dishtowel
Plastic colander
Flat, square-sided tupperware container
Straightedge razor blade or serrated knife
Dough whisk
Plastic dough scraper
Metal bench scraper
Kitchen timer
Place flour in plastic container. Mix water and starter or sponge in a bowl until homogeneous, then pour over the flour. Stir with a dough whisk or a wooden spoon until flour is fully incorporated. Cover and let sit for 15 minutes.

Place a quart container of water nearby, for dipping your hands into as you work. Sprinkle half of the salt over the dough. Wet your fingertips, and press the salt into the dough for 30 seconds or so. Flip the dough over, and repeat with the remaining salt. Cover tightly and let sit for 30 minutes.
(‘Stretch-and-fold’ method)
Wet your hands, and very gently press the dough to flatten it slightly. You want to stretch it out to the edges of the container while maintaining any trapped gas bubbles that have formed, so don’t manhandle it. Wet your hands again, and lift one edge of the dough, pulling it toward the center of the mass, and drop it there, like you are folding a letter into thirds. Continue like this, working your way around the dough until you come back to the starting point, or just until the dough starts to tighten up. Cover and let sit for 1 hour.


Repeat the stretch-and-fold once per hour for a total of 3 or 4 reps. Over this time, the dough should change from a shaggy, rough mess to a silky smooth ball. After the last stretch-and-fold, cover the container and place in the refrigerator.
The dough may be baked as soon as 24 hours later, or held in the refrigerator for as long as 1 week. The flavor and acidity will improve over time, so I like to give it at least two days. (If you make a larger batch of dough, doubling or quadrupling the above recipe, you can take out portions for baking at any point during the week.)

Remove the dough from the refrigerator and dump it onto a well-floured countertop (if you are dividing a larger batch of dough, portion out what you need and return the remainder to the fridge). Dip your hands into flour, and then gently flatten the dough into a thick, rough circle 6-8″ in diameter, again being careful not to de-gas it.

Flour the top surface of the disc liberally, and then flip it over. With both hands, grab the circumference of the disc and pinch it together, forming the mass into a tadpole shape. Turn the mass on its side, so that the tail is laying flat on the countertop and to one side. Place the heel of your hand just above the base of the tail (imagine you are giving it a karate chop), and roll the mass forward under your hand. This is a little hard to describe, but will make sense after a few tries; the point of the exercise is to seal the tail tightly and to pull the skin of the dough toward it, tightening the ball, which will give the loaf ‘lift’ as it proofs and bakes in the oven. Place the ball on the countertop tail side down, dusting its upper surface with flour.

Line your colander with a towel and dust it liberally with rice flour. Place the dough in the center of the towel, tail side up.

Cover it loosely with another towel, and let sit for at least 1 hour. When the dough is ready for baking, it should be close to room temperature, and should not spring back when poked gently with a fingertip. If not, don’t worry about it, it should still bake fine, as long as it has had at least an hour to proof.
In the meantime, place the pot and its cover on the center rack of your oven, and heat it to 500˚F. In order for pot to absorb enough heat to bake the loaf well, it will need to heat for at least 30 minutes beyond the point the oven comes up to temperature (90 minutes should be enough.)
When you are ready to bake, carefully remove the pot from the oven, place it on your stovetop, and put the cover to one side. Flour your hands and the bottom of the dough (the ‘tail’ side) liberally. Lift the colander in one hand and flip the dough into the other hand, removing the colander and towel. Holding the dough in both hands, very carefully and very gently drop it into the center of the pot. Remember, the pot will be ridiculously hot at this point and will give a nasty burn if you touch it, so DON’T TOUCH IT. Slash the top of the loaf in an X pattern, just deep enough to cut the ‘skin’ and expose the moist interior, about 1/4″ deep, nearly from edge to edge of the loaf. Cover the pot and return it to the oven. Lower the oven temperature to 450˚F, and set your timer for 30 minutes.
After 30 minutes, lower the oven temperature to 400˚F and remove the pot lid. Set your timer for 20 minutes.
After 20 minutes, examine the loaf for color, which you want to be russet rather than tan. It is better to err a little on the dark side, since even a burnt crust will have a well-baked interior, while an undercooked loaf will be doughy and insipid, and will not keep well. Remove the loaf if it is done, otherwise check every 5 minutes until it is. To get the loaf out of the pot, carefully tip it onto the counter.
Place the loaf onto a cooling rack and allow to cool overnight. Resist, if possible, the urge to slice the bread while it is still warm. The center of a loaf right out of the oven will still be quite gummy; it will be difficult to slice, and will not keep well if cut into too soon.
To store: leave the loaf out on the countertop, cut side down. Do not place it in a bag, which will only encourage the growth of mold. Left out, it will slowly go stale, but that is fine since stale bread remains good for toast, crostini, breadcrumbs, bread puddings, dipping into hot bowls of soup, and so on, while moldy bread is nothing but food for squirrels.
Notes:
Flour: If you live in the northeast, you are golden, since King Arthur brand all-purpose flour should be easy to find. Even though it is billed as ‘all purpose’, it is about 12% gluten, making it not so hot for flaky biscuits or airy angel food cake, but right on the money for crusty bread. On top of that, it is flour of very high quality and consistency. If KA is not available, look for bread flour, or all purpose flour with 10-12% protein.
Water: Yeasts and bacteria don’t play well with the chlorine in tap water, so use filtered or bottled water, or let the chlorine in your tap water evaporate by leaving a pot of it out on the counter overnight, uncovered.
Sourdough Starter or Yeast Sponge: This bread is better made with a sourdough starter, since it will have greater depth of flavor and will keep longer. To feed your starter, give it equal weights of flour and water, or 1 c flour and 5/8 c water. It is best to do this at least 4h before you want to use it, preferably the night before.
If you don’t have a starter, you can also use a yeast sponge instead, using the following recipe:
Yeast Sponge:
1 cup of flour (250g)
5/8 cup of water (250g)
1/4 tsp instant yeast (1g)
Stir ingredients together and let stand overnight at room temperature, covered. When you return to it, it should be bubbly and alive. Use within 12 hours.
Rice flour: Rice flour can be found at health food or grocery stores, or made by grinding white rice in a spice mill or coffee grinder, to the consistency of fine cornmeal.

Enameled Cast-Iron Pot: Nothing fancy needed, as long as it is heavy walled and has a heavy, tight-fitting lid. Le Creuset-style knockoffs can often be found at discount houseware shops for a song.
Linen dishtowel: Linen is best, since dough does not stick to it. Cotton will work, but you’ll probably need to compensate by dusting with more rice flour.
Plastic Colander: Should be large enough to hold the fully-proofed loaf, at least 10″ in diameter, with round sides, lots of holes, and self-supporting. Good ones can be found on the cheap at asian markets.
Tupperware container: Should be large enough to hold the fully risen dough, 4 quarts or so, and wider than it is tall.
Straightedge razor blade or serrated knife: For slashing loaf. A sharp, serrated-edge knife will work, though disposable, double-edged razor blades give a cleaner slash. See the photograph for a makeshift cork-handled slashing tool, which is just a double-edged razor blade carefully embedded into a cork (replace the blade once every four bakes or slow, they go dull quickly.)

Dough whisk: Also known as a Danish dough whisk; a double loop of stiff wire on the end of a wooden handle. This is the bread maker’s best friend. It makes quick work of mixing doughs and batters, and cleans up easily.
Plastic dough scraper: Useful for pulling dough out of containers. A flat plastic or silicone spatula is an acceptable substitute.
Metal bench scraper: For dividing dough and lifting it off of the countertop. A long metal spatula will work.
Posted in Bread
To my mind, most useful type of bread or pizza dough recipe is one that is written in terms of Baker’s Percentages, wherein the amount of each ingredient is expressed relative to the total weight of flour. There are numerous reasons why this method is superior to other types of bread recipe writing. First, since each ingredient must be weighed, it allows for simple, precise measuring and easy repeatability. Second, scaling a recipe up or down becomes a simple matter of multiplication, allowing recipes to be altered or adapted with a minimum of fuss. Finally, it provides a common language for describing bread recipes, one that is independent of units of measure. This enables bakers to easily communicate formulas, and allows a baker to quickly assess the features of any particular recipe by simply considering the percentages used.
Learning to work with baker’s percentages can be a little confusing at first, but once you become accustomed to the method, you’ll know why most bakers utilize it. (One side benefit that derives from understanding baker’s percentages is that with it one can quickly judge the reliability of a cookbook or published recipe by examining how its dough recipes are written. In my experience, if they aren’t given as percentages, the author either isn’t a baker or has deemed it necessary to dumb down the text for the “benefit” of the reader. In either case, such recipes should be taken with a large heaping of salt.)
Working with baker’s percentages requires having a quality kitchen scale, since each ingredient, liquids included, will be expressed in terms of weight. You’ll want a scale that is accurate to at least 2 grams and has a capacity of at least 2.2 kilos/5 pounds, though one with a maximum capacity of 5 kilos/11 pounds is better, since it will allow you to weigh ingredients directly into whatever container you wish. A good scale will cost between $25-75; as an essential tool in any well-equipped kitchen, the expense will pay for itself in no time. For useful ideas on what to look for in a scale, I highly recommend this article.
Once you have a good scale, I also recommend you start using the metric system of weights (if you have not already) rather than the English system of pounds and ounces. Once you become accustomed to it, the metric system is much easier to use, since you rarely need to consider fractions of units, as the basic unit of measure is a relatively small 1 gram. (Who the hell knows what 0.27 ounces weighs anyway? Nobody, but it’s about 8 grams).
To grasp baker’s percentages, it’s easiest to see examples of the system in use, then play around with them yourself, both on paper and in the kitchen.
Here’s an example formula:
There are several things to note about the above formula:
Creating a recipe from the formula is simple. The only question to consider at the outset is whether you are starting from a given weight of flour or with the final weight of dough desired.
If you are starting with a given amount of flour, you simply multiply that number by each percentage (expressed as a decimal value) to determine the weight of the ingredient in question. So, starting with 500 grams of flour, you would need:
If on the other hand, you want to make a loaf of bread weighing a certain amount, you simply divide that number by the total percentage (1.7575) to determine the amount of flour needed. Thus, for a one kilo loaf:
Then you simply insert this amount into the formula to determine the weights of the remaining ingredients:
Since baker’s percentages formulas are unit-independent, converting a recipe to another unit of measure is simple. For example, say you want to make 150 pounds of dough from the above formula:
Converting Recipes into Baker’s Percentages
Since many recipes you will encounter will not be written using baker’s percentages, you’ll need to know how to convert to them in order to standardize the formula. As long as you know the weight of each ingredient, the method is simple. Here’s an example:
To determine the percentages of the other ingredients, all you need to do is divide the weight of each by the weight of flour in the recipe:
Standard Volume to Weight Conversions
Of course, if the recipe is written in volume measurements, you’ll have to convert them to weights before you can work out the baker’s percentages. This can be a little tricky, since you often won’t be able to say for sure what 1 unit of volume of the individual ingredient really weighs. (Yet another reason to work primarily with recipes and cookbooks that give recipes as baker’s percentages.)
Here is a table that contains the ingredients you’ll find in my recipes:
Volume
Weight
Baker’s Percentages and Preferments
If your recipe uses a sourdough starter or preferment, sorting out baker’s percentages is a little more complicated. The starter is treated as any other ingredient, with its amount presented as a percentage of the total. But since it is a mixture of flour and water, its presence has an effect on the total amounts of each in the overall recipe. For this reason, such recipes are often presented twice, once with the basic list of ingredients, and again with the percentages adjusted to account for the preferment, to give the “true” percentages.
Here’s an example set of formulas:
Starter:
Overall formula:
Comments Off on Understanding Baker’s Percentages
Posted in Bread, Pizzearch, Uncategorized

I whipped up a batch of German soft pretzels last night, using the recipe from Jeffrey Hamelman’s Bread. I think they came out pretty good, in case you were wondering. It’s surprising how quickly a more than a pound of dough can be consumed when it is formed into hot little twists. I ate three of them myself before they’d even had time to cool down.
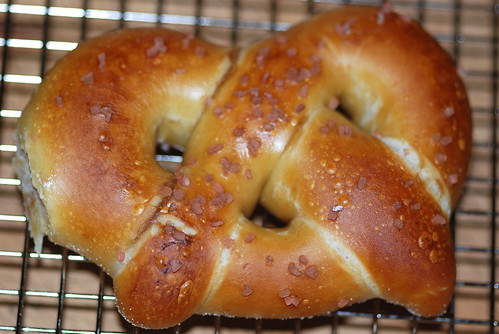
I didn’t have pretzel salt on hand, so I used Hawaiian pink salt, which has crystals about the right shape and size. It tasted fine, but as you can see it turned a cruddy grey color. I need to make a trip down to the salt district to get the right stuff before the next time I bake these.
My favorite thing about making pretzels (aside from eating them, that is) is that before baking they are briefly dipped in a 4% solution of lye (sodium hydroxide). This serves a number of purposes: the moisture itself gelates the surface starches, resulting in a shiny crust, while the lye promotes browning reactions and creates that unique “pretzel” flavor.
A 4% lye solution has a pH of 14, meaning it is as alkaline a solution as you can get, i.e., it can burn the shit out of you if you’re not careful. Fortunately for pretzel lovers, the lye on the dough reacts with carbon dioxide in the oven to form harmless carbonates. (As always, the skinny on all this can be found in Harold McGee’s essential reference On Food and Cooking.)
UPDATE (8/5/08): For those of you who are looking for lye to use, please don’t use hardware store grade, who knows what crud is in that stuff. What you want is FOOD GRADE LYE, which can be had here, for the low low price of $239 for 128 pounds, which should last you a while. (Okay, yes, they sell smaller quantities if you don’t have the cupboard space for that much.)
Also, this kind fellow posted the Hamelman recipe so I wouldn’t have to. Enjoy!
Posted in Bread
From today’s Boston Globe food pages:
Great pizza, plain and simple:
If it ain’t broke, don’t fix it. What ain’t broke at the Riverview in Ipswich is the pizza, served the “old way” or regular. This year Saveur magazine named Riverview’s pie to its top 100 list. “Old way” means the sauce and seasonings are placed on top of the cheese, as though the sauce is so good they want you to taste that first. Recipes for the sauce and crust are top-secret. One server, who says she’s been at the restaurant since she was 18 and is now 46, says the recipes are still a mystery to her. Fancy it isn’t. The lighted beer sign hanging above the booths is still the same as when the pizza-only restaurant opened in 1947. What pass for plates are really rectangular slips of parchment paper. Handwritten checks are punctuated with a red smiley-face stamp. They don’t accept credit cards. Fortunately, a family of four could easily eat dinner on the spare bills in your pocket; the basic cheese and tomato pie is $5. Pizzas are one size only. The toppings menu tucks in some pleasant surprises, and is a carnivore’s delight: You’ll find both sausage and kielbasa, pepperoni and salami. The Riverview, 20 Estes St., Ipswich, 978-356-0500.– CATHY HUYGHE
Any of you MINTM readers on the North Shore been there?
Posted in Pizzearch
Some of the (3) readers of this blog may know that I’m thinking about starting a pizza restaurant, and that part of what I plan to document here are my attempts to perfect my recipes toward that end. It now appears that my grand plan to provide superlative pies to my neighborhood has been a total waste of time, and I need to hang up my apron and peel:
Wonder Pizza of Italy will place America ‘s most popular food source in places never before available.
The innovative machine holds, cooks and serves 9” whole pizza pies in just 2 minutes. There are 3 different pizzas available in each machine at one time. Delicious Connie’s Pizza of Chicago is featured in all WonderPizza Kiosks. 5 years and 6 million dollars of R&D went into this design and subsequent manufacture of WONDERPIZZA of Italy and the product is now beginning worldwide distribution.
WONDERPIZZA of Italy will place America’s most popular food source in places heretofore unavailable.
It is an appealing, convenient, hot, nutritious, tasty pizza delivered in approximately two minutes.
Oh, well. It was fun while it lasted.
For the price of a stamp, you can get a dried culture of a sourdough starter that has been maintained for more than 150 years, after having traveled from Missouri to Oregon. Carl Griffith maintained and freely distributed this starter for years until he died in 2000 at the age of 80. Since then, a number of his friends have kept the tradition and the culture alive for him. Yet another instance of the ways that fungi (and bacteria too, in this case) enlist humans to further their evolution and survival.
Here’s the backstory:
All I know is that it started west in 1847 from Missouri. I would guess with the family of Dr. John Savage as one of his daughters (my great grandmother) was the cook. It came on west and settled near Salem Or. Doc. Savage’s daughter met and married my great grand father on the trail and they had 10 children. It was passed on to me though my parents when they passed away. I am 76 years old so that was some time ago. I first learned to use the starter in a basque sheep camp when I was 10 years old as we were setting up a homestead on the Steens Mountains in southeastern Oregon. A campfire has no oven, so the bread was baked in a Dutch Oven in a hole in the ground in which we had built a fire, placed the oven, scraped in the coals from around the rim, and covered with dirt for several hours. I used it later making bread in a chuck wagon on several cattle drives – again in southeastern Oregon.
Considering that the people at that time had no commercial starter for their bread, I do not know when it was first caught from the wild or where, but it has been exposed to many wild yeasts since and personally I like it. I hope you enjoy it.
Link (As seen at BoingBoing)

The Baker’s Edge is a baking pan with a single, narrow compartment, designed to maximize the ratio of edge to interior, so that brownies and other bar cookies cook more uniformly than they would in a regular pan. Most of the people to whom I showed this pan at first did not get the point of it. They thought it should work great if you are someone who likes crispy, chewy edges on your brownies, but not so well if you were into soft, undercooked (or at least not browned) center bars. Not so fast, smart guy; this might look like an “all edge” pan, but all edge quickly becomes “all center” if you take the pan out before it starts to brown.
I don’t own one of these myself, but I did give two of them as gifts this past Xmas. I haven’t yet heard back from either of my giftees about how they like the pan, but fellow kitchen scientologists at Cooking For Engineers put it to the test recently, and they gave it high marks, especially for edge lovers:
Each of the brownies from the Baker’s Edge did indeed have chewy edges – two of them (and sometimes three) in fact. It was almost like every piece was a corner piece from the standard pan. Therein laid a problem I hadn’t considered. I had tasters that liked brownies with edges and tasters that liked brownies that didn’t have any chewy edges but were soft and moist throughout. With the regular pan, I had corner pieces, edge pieces, and center pieces (although there are always more than four people who want corner pieces and not enough edge pieces). For the edge lovers, the brownies from the Baker’s Edge were perfect – chewy edges surrounding a moist chocolate brownie. For the center lovers, the brownies were good, but they much preferred the texture of the brownies from the 9×13 pan.
Read on: Baker’s Edge Review

Not sure how functional these are, but they are undoubtedly cool to look at: Link
(Post title borrowed from David Cronenberg’s creepy, brilliant film Dead Ringers.)
Posted in Pizzearch


